rulypirata4

iklan

Minggu, 23 Oktober 2011

CANON 60D

Canon 60D
Belum punya ?, beli di sini murah
Jual CAMERA online Terpercaya!

Canon 60D Rp. 3.500.000,- Info : 085 730 654 515
Canon 60D Rp. 3.500.000,-
Info Order melalui
Via telpon : 085 730 654 515
Spesifikasi lengkap canon 60D :
Model Type APS-C Digital SLR
Max. Image Resolution 18 Megapixel
Sensor CMOS 22.3 x 14.9mm
Image Processor Canon DIGIC 4
Dust Reduction System Yes

* Self Cleaning Sensor Unit
* Dust Delete Data appended to the captured image
* Manual cleaning of sensor


Still Image Size

* Large/Fine: Approx. 17.90 Megapixels (5184 x 3456)
* Medium/Fine: Approx. 8.00 Megapixels (3456 x 2304)
* Small 1/Normal: Approx. 4.50 Megapixels (2592 x 1728)
* Small 2/Fine: Approx. 2.50 Megapixels (1920 x 1280)
* Small 3/Fine: Approx. 0.35 Megapixels (720 x 480)
* RAW: Approx. 17.90 Megapixels (5184 x 3456)
* M-RAW: Approx. 10.10 Megapixels (3888 x 2592)
* S-RAW: Approx. 4.50 Megapixels (2592 x 1728)


Still Image Formats

* RAW
* JPEG
* RAW + JPEG


Movie Size and Recording

* 1920 x 1080 Full HD video at frame rates of 30 (29.97 fps), 24 (23.976 fps) and 25.0 frames per second,
* 1280 x 720 (50/60 fps)
* 640 x 480 (50/60 fps)


Movie Formats MOV
Lens Mount Canon EF mount

* Canon EF lenses (including EF-S lenses)


Auto Focus

* TTL-CT-SIR AF-dedicated CMOS sensor
* 9 (Cross-type, Center AF point with dual cross sensor for f/2.8)
* Automatic selection, manual selection


Auto Focus Modes

* Autofocus
* One-Shot AF
* Predictive AI Servo AF
* AI Focus AF
* Manual focusing (MF)


Metering System

* Evaluative metering (linkable to all AF points)
* Partial metering (approx. 6.5% of viewfinder at center)
* Spot metering (approx. 2.8% of viewfinder at center)
* Center-Weighted average metering


AE Lock and AE Bracketing

* Auto AE lock - In the One-Shot AF mode with evaluative metering, AE lock takes effect when focus is achieved.
* Manual AE lock - With AE lock button. (AE lock is updated each time you press the button.) Enabled in all metering modes.


Exposure Compensation

* Manual: ±5 stops in 1/3- or 1/2-stop increments
* AEB: ±3 stops in 1/3- or 1/2-stop increments
o * Indicated up to ±3 stops on the LCD panel and in the viewfinder.


ISO Sensitivity

* ISO 100 - 6400 (in 1/3-stop or whole-stop increments)
* ISO 12800 can be enabled with a Custom Function.


Shutter

* Vertical-travel, mechanical, focal-plane shutter with all speeds electronically-controlled 1/8000 to 1/60 sec., X-sync at 1/250 sec.
* 1/8000 to 30 sec., bulb


White Balance

* Auto
* Daylight
* Shade
* Cloudy
* Tungsten Light
* White Fluorescent Light
* Flash
* Custom
* Color Temperature setting


Viewfinder

* Eye-level pentaprism
* Coverage : Vertical/Horizontal approx. 96%
* Magnification : Approx. 0.95x (-1m-1 with 50mm lens at infinity) / 27.0° angle of view
* Eye Point : Approx. 22mm (At -1m-1 from eyepiece lens center)
* Dioptric Adjustment Correction : -3.0 to +1.0m-1 (diopter)


LCD Monitor

* 3.0" TFT color LCD
* Coverage Approx. 100%
* Viewing angle: Approx. 160°


Internal Flash Yes

* Auto pop-up, retractable, built-in flash in the pentaprism
* Guide Number : 43/13 (ISO 100, in feet/meters)
* Flash Exposure Compensation : Up to ±3 stops in 1/3- or 1/2-stop increments
* E-TTL II autoflash


External Flash Flash function settings, Flash C.Fn settings
Live View

* Live View shooting
* Remote Live View shooting (with a personal computer installed with EOS Utility)
* Live mode - One-point, contrast AF. Switching to another AF point possible.
* Face Detection Live mode - Face Detection, Contrast AF. Face selectable.
* Quick mode - Nine-point, phase-difference AF, same as normal shooting.
* Manual focus - Magnify the image by 5x or 10x and focus manually.


Storage SD, SDHC, SDXC card
Connectivity USB v.2.0
Power Source Battery Pack LP-E6
Dimensions (W x H x D) 144.5 x 105.8 x 78.6mm
Weight 675g (body only)
Warranty 1-year Limited Warranty by Authorized Distributor

KETENTUAN
* Pengiriman sepenuhnya oleh TIKI JNE sbg biro jasa pengiriman barang.
*Status pengiriman bs dicek lgsg di website dengan memasukkan no resi pengiriman.
*Brg bs sampai lebih cepat dgn "Paket Kilat" Tiki JNE (harga lebih mahal dr paket reguler).

Prosedur Transaksi Pemesanan Gadget :

1. Pembeli mentransfer Uang ke rek.bendahara kami melalui Bank MANDIRI,dan BCA ( Nomor Rekening silahkan di Minta ke kami Melalui Inbox/Sms ke 085730 654 515 )

2. Batas waktu transfer adalah : Jam 08.00 pagi - Jam 17.00 sore.Lewat jam tersebut akan masuk ke pengiriman besoknya.

3. Harap Segera Konfirmasi setelah transfer dan kirimkan alamat lengkap Anda via sms ke 085730 654 515

4. Barang dikirim via TIKI JNE ke alamat Pembeli ( Bila kota Anda ada Bandara maka dalam 1 hari barang akan sampai ditangan Anda,bila kota Anda tidak ada bandara maka maka akan memakan waktu 2 hari untuk sampai di tangan Anda)

5. Kami akan mengirim no resi ke pembeli sehingga Pembeli bisa melacak posisi perjalanan Gadget yang di pesan telah sampai mana dengan memasukkan nomor Resi yang telah kami Kirimkan
6. Setiap pengiriman Gadget melalui TIKI JNE kami Asuransikan.Jadi anda tidak perlu takut lagi barang tidak sampai/Hilang/Rusak di pengiriman.

Note : Anda tidak perlu khawatir/takut untuk Shopping Gadget ke kami karena kami murni DAGANG 100%

Klaim Garansi ke kita dengan Cara Barang tersebut silahkan dikirim Balik Ke kami VIA JNE dan Setelah Barang Tersebut Sampai akan kita cek dan Apabila Memang Ada Kerusakan sesuai yg di keluhkan maka Barang akan kami Kirimkan Barang yang Baru sebagai Pengganti nya

Jumat, 07 Oktober 2011

KOMIK


Commentary by Mike Adams, the creator of this cartoon:

The fluoride issue is, in my opinion, a “sanity test” for anyone who claims to know anything about health. As I will explain here, all the dentists, doctors and government health authorities who actually promote the fluoridation of public water supplies are nothing less than clinically insane.
How do I know? Because I know where this so-called “fluoride” comes from. Cities actually buy the stuff from coal plants and chemical manufacturers, where it would normally have to be disposed of as a toxic waste chemical if it wasn’t sold to towns and cities to be dumped into the water supply. This fluoride byproduct of chemical processing is so toxic that it’s a violation of environmental laws to dump it into any river. Yet it’s somehow perfectly legal to feed it to infants, children, adults and senior citizens who are drinking from the public water supply. Interesting, huh? It’s so toxic that it kills fish, but dentists want your babies to drink it.
The entire pro-fluoride argument lacks a single shred of scientific evidence showing any benefit whatsoever to the mass consumption of the fluoride chemical. Essentially, the leaders in dentistry and medicine simply invented a myth about fluoride and dental health, then invested their careers and egos in the desperate defense of this myth, even as the scientific evidence clearly shows increased rates of hip fractures, fluorosis and even cancer from fluoride consumption.
The claims about fluoride essentially make it a drug according to FDA regulations, yet this “drug” has never been approved as a treatment or cure for dental caries by the FDA. Furthermore, can you think of any other drug that is mass-medicated to the entire population with no diagnosis, no medical oversight and no patient follow-up whatsoever? It’s like dumping Prozac into the water supply and saying, “Everyone is depressed and needs their brain chemistry balanced.” A silly idea, of course, but it’s essentially the same as dumping fluoride into the water supply.
Of course, any use of reason, logic or genuine science is not allowed in the fluoride debate. Dentists, doctors and health authorities viciously defend the indiscriminate fluoridation of all humans with the ferocity of rabid pack dogs. For any sane person to even suggest that perhaps industrial waste chemicals should not be dumped into public water supplies is to invite a wild-eyed verbal assault by dentists so filled with ignorance and froth that you would think you were insulting the false gods of some outdated superstition from eons past. Which, of course, is exactly what fluoridation is: superstition.
Any perceived health benefit of mass fluoridation is nothing more than persistent myth, desperately defended by the most irrational, unscientific and easily offended members of modern society — who all happen to reside in some branch of medicine, by the way. These myth pushers claim to base their support of dumping toxic chemicals into the water supply based on so-called “scientific evidence” that they can never quite produce. The only evidence they have is the circular-logic statements of various dentists quoting each other in some sort of deviant doctoral blabbing contest. Meanwhile, they selectively ignore any real evidence from scientific studies showing the damaging effects of fluoride.
Selective censorship of reality is, of course, the very foundation of modern dentistry — an industry that exists in such blatant denial of reality that it continues to implant some 34 metric tons of mercury — one of the most toxic substances to human and environmental health — into the mouths of dental patients each year. All while calling it perfectly safe, of course.
Mercury is perfectly safe, they all proclaim. And so is fluoride. And, come to think of it, there’s no such thing as any chemical too dangerous to put in the mouths or stomachs of patients as long as your dentist says so. And while we’re at it, don’t forget to have your wisdom teeth surgically removed — yet another medically useless procedure that’s been scientifically shown to be utterly worthless according to the British Medical Journal. I, for one, still have all my wisdom teeth, and nearly every time I see a new dentist, the idiot insists that I have them surgically removed even though they are entirely asymptomatic (i.e. nothing’s wrong with them).
All this explains why the fluoride question is such an effective sanity test. Anyone who genuinely supports the disposal of toxic fluoride chemicals via public waterways is not merely a fool and a danger to themselves; they are a danger to society and should probably be locked away in some sort of institution where crazy people can bang their heads against the walls until their mercury fillings fall out. There, at least, they won’t harm anybody else.
Fortunately, there are a growing number of sane dentists and doctors in the world. One of the leading organizations in this regard is the IAOMT. Watch their “Smoking Teeth” video if you want to learn the truth about mercury fillings, or read their Position on Fluoridation to hear what sane, intelligent dentists have concluded about mass fluoridation practices.
And if you still have mercury fillings in your mouth, get them removed by a dentist who specializes in mercury removal. Be sure to take plenty of chlorella and Jon Barron’s Metal Magic tincture before and after any such procedure to minimize the amount of fluoride that gets into your body during removal.
Finally, if your dentist continues to push fluoridation and mercury fillings (they call them “silver fillings” to hide the fact that they’re made with mercury), fire the idiot and find yourself a new dentist who runs a more natural health oriented practice. Natural dentistry is a growing practice. And it’s no mystery why. The American Dental Association, in my opinion, remains stuck in the Dark Ages. I can’t wait for the day when they finally reverse their support of fluoride and mercury and join the rest of the sane people in the world who have long since figured out that toxic chemicals do not belong in the human body.
This is not complicated, folks. I think that perhaps the only reason anyone still supports fluoride or mercury is because their brains have been affected by the chemicals.
And yes, by the way, it’s true that people who handle fluoride have to wear chemical suits, just as shown in this comic. If you drop a bottle of pure fluoride and inhale the fumes or get some on your skin, it can kill you

majari magazine.....

SYAHRINI MENCIUM HYUN BIN

Jum'at, 7 Oktober 2011, 13:24 WIB
Hyun Bin Menyaksikan Sejumlah Latihan Militer
Di markas Marinir TNI AL Cilandak, Jakarta Selatan, aktor Korea Selatan, Hyun Bin menyaksikan sejumlah latihan militer bersama pasukan anti teror TNI AL

KLIK DISINI ! buruannnnnnnn........

VOCATION


@coban rondo with my ditya , raaras and arin

fenesaa

Senin, 23 Mei 2011

PEMENANG CCI ISAC 2O11


                                                PEMENANG ISAC 7 2011


SELAMAT BAGI PEMENANG JUARA 1 CCI tahun ini dimenangkan oleh  MA.MANBA'UL HIKAM 
  
RANI RAHMA WATI 
IKHA AYU FITRIANITA 
SITI MIFTAKHUL ULA 


foto menyusul

regard

Kamis, 12 Mei 2011

SISTEM KOLOID

                                            PENGERTIAN KOLOID

Koloid adalah suatu bentuk campuran yang keadaannya antara larutan dan suspensi. Larutan memiliki sifat homogen dan stabil. Suspensi memiliki sifat heterogen dan labil. Sedangkan koloid memiliki sifat heterogen dan stabil. Koloid merupakan sistem heterogen, dimana suatu zat "didispersikan" ke dalam suatu media yang homogen. Ukuran zat yang didispersikan berkisar dari satu nanometer (nm) hingga satu mikrometer (µm).

perhatikan perbedaan tiga contoh campuran di bawah ini :

1. Campuran antara air dengan sirup.

2. Campyuran antara air dengan susu.

3. Campuran antara air dengan pasir.


Jika kita campurkan air dengan sirup maka sirup akan terdispersi (bercampur) dengan air secara homogen (bening) Jika didiamkan, campuran itu tidak memisah dan juga tidak dapat dipisahkan dengan penyaringan biasa maupun penyaringan yang lembut (penyaringan mikro). Secara makroskopis maupun mikroskopis mcampuran ini tampak homogen, tidak dapat dibedakan mana yang air dan mana yang sirup. Campuran seperti inilah yang disebut larutan.

Jika kita campurkan susu (misalnya, susu instan) dengan air, ternyata susu "larut" tetapi "larutan" itu tidak bening melainkan keruh. Jika didiamkan, campuran itu tidak memisah dan juga tidak dapat dipisahkan dengan penyaringan (hasil penyaringan tetap keruh). Secara makroskopis campuran ini tampak homogen. Akan tetapi, jika diamati dengan mikroskop ultra ternyata masih dapat dibedakan partikel-partikel lemak susu yang tersebar di dalam air. Campuran seperti inilah yang disebut koloid.

Jika kita campurkan air dengan pasir maka pasir akan terdispersi (bercampur) dengan air secara heterogen dan langsung  memisah antara air dengan pasir, yang keadaannya pasir akan mengendap di dasar air dan dapat dipisahkan dengan penyaringan biasa, bahkan dapat dipisahkan dengan cara dituang perlahan-lahan. Secara makroskopis campuran ini sudah tampak hetrogen, dapat dibedakan mana yang air dan mana yang pasir. Campuran seperti inilah yang disebut suspensi.

Jadi, koloid tergolong campuran heterogen (dua fase) dan setabil. Zat yang didipersikan disebut fase terdispersi, sedangkan medium yang digunakan untuk mendispersikan zat disebut medium dispersi. Fase terdispersi bersifat diskontinu (terputus-putus), sedangkan medium dispersi bersifat kontinu. Pada campuran susu dengan air, fase terdispersi adalah lemak, sedangkan medium dispersinya adalah air.

PEMBUATAN KOLOID

Cara Kondensasi

Cara kondensasi termasuk cara kimia.

Partikel molekular ------> Partikel koloid

contoh :

Reaksi Redoks
2 H2S(g) + SO2(aq)  ------>   3 S(s) + 2 H2O(l)

Reaksi Hidrolisis
FeCl3(aq) + 3 H2O(l)  ------>   Fe(OH)3(s) + 3 HCl(aq)

Reaksi Substitusi
2 H3AsO3(aq) + 3 H2  ------> S(g)   As2S3(s) + 6 H2O(l)


Reaksi Penggaraman

Beberapa sol garam yang sukar larut seperti AgCl, AgBr, PbI2, BaSO4 dapat membentuk partikel koloid dengan pereaksi yang encer.

AgNO3(aq) (encer) + NaCl(aq) (encer)  ------>  AgCl(s) + NaNO3(aq) (encer)

Cara Dispersi

Cara dispersi dapat dilakukan dengan cara mekanik atau cara fisika:
Partikel Besar  ------> Partikel Koloid

Cara Mekanik

Cara ini dilakukan dari gumpalan partikel yang besar kemudian dihaluskan dengan cara penggerusan atau penggilingan.

Cara Busur Bredig

Cara ini digunakan untak membuat sol-sol logam.

Cara Peptisasi

Cara peptisasi adalah pembuatan koloid dari butir-butir kasar atau dari suatu endapan dengan bantuan suatu zat pemeptisasi (pemecah).

Contoh:
- Agar-agar dipeptisasi oleh air ; karet oleh bensin.
- Endapan NiS dipeptisasi oleh H2S ; endapan Al(OH)3 oleh AlCl3


SIFAT KOLOID

Efek Tyndall
Efek Tyndall adalah efek penghamburan cahaya oleh partikel koloid.

Gerak Brown
Gerak Brown adalah gerak acak, gerak tidak beraturan dari partikel koloid.

Adsorbsi
Beberapa partikel koloid mempunyai sifat adsorbsi (penyerapan) terhadap partikel atau ion atau senyawa yang lain.
Penyerapan pada permukaan ini disebut adsorbsi (harus dibedakan dari absorbsi yang artinya penyerapan sampai ke bawah permukaan).

Contoh :
(i) Koloid Fe(OH)3 bermuatan positif karena permukaannya menyerap ion H+.
(ii) Koloid As2S3 bermuatan negatit karena permukaannya menyerap ion S2.

Koagulasi
Koagulasi adalah penggumpalan partikel koloid dan membentuk endapan. Dengan terjadinya koagulasi, berarti zat terdispersi tidak lagi membentuk koloid.
Koagulasi dapat terjadi secara fisik seperti pemanasan, pendinginan dan pengadukan atau secara kimia seperti penambahan elektrolit, pencampuran koloid yang berbeda muatan.

Koloid Liofil dan Koloid Liofob
Koloid ini terjadi pada sol yaitu fase terdispersinya padatan dan medium pendispersinya cairan.

Koloid Liofil:
sistem koloid yang affinitas fase terdispersinya besar terhadap medium pendispersinya.
Contoh: sol kanji, agar-agar, lem, cat

Koloid Liofob:
sistem koloid yang affinitas fase terdispersinya kecil terhadap medium pendispersinya.
Contoh: sol belerang, sol emas.

Eektroforesis
Elektroferesis adalah peristiwa pergerakan partikel koloid yang bermuatan ke salah satu elektroda.
Elektrotoresis dapat digunakan untuk mendeteksi muatan partikel koloid. Jika partikel koloid berkumpul di elektroda positif berarti koloid bermuatan negatif dan jika partikel koloid berkumpul di elektroda negatif berarti koloid bermuatan positif.
Prinsip elektroforesis digunakan untuk membersihkan asap dalam suatu industri dengan alat Cottrell.

Dialisis
Dialisis adalah proses pemurnian partikel koloid dari muatan-muatan yang menempel pada permukaannya.
Pada proses dialisis ini digunakan selaput semipermeabel.


JENIS KOLOID

  • Aerosol : suatu sistem koloid, jika partikel padat atau cair terdispersi dalam gas. Contoh : debu, kabut, dan awan.
  • Sol : suatu sistem koloid, jika partikel padat terdispersi dalam zat cair.
  • Emulsi : suatu sistem koloid, jika partikel cair terdispersi dalam zat cair.
  • Emulgator : zat yang dapat menstabilkan emulsi dan (Sabun adalah emulgator campuran air dan minyak dan Kasein adalah emulgator lemak dalam air?.
  • Gel : koloid liofil yang setengah kaku.
  • Gel terjadi jika medium pendispersi di absorbs oleh partikel koloid sehingga terjadi koloid yang agak padat. Larutan sabun dalam air yang pekat dan panas dapat berupa cairan tapi jika dingin membentuk gel yang relatif kaku. Jika dipanaskan akan mencair lagi.

Selasa, 05 April 2011

the best photografy

wowowowowowo fotografer kurang ajar foto banteng lagi kasmaran


gaya nyemplung ala perenang bego lol


gaya ngintip ala fotografer kreatif


gaya fotografer alay minta difoto lol


gaya fotografer minta di jepret to lol

gaya fotografer kehujanan maksa foto objek


sepeda dengan fotografer konyol

Kamis, 31 Maret 2011

Larutan penyangga


                      Larutan penyangga


Dari Wikipedia bahasa Indonesia, ensiklopedia bebas

Larutan penyangga, larutan dapar, atau buffer adalah larutan yang digunakan untuk mempertahankan nilai pH tertentu agar tidak banyak berubah selama reaksi kimia berlangsung. Sifat yang khas dari larutan penyangga ini adalah pH-nya hanya berubah sedikit dengan pemberian sedikit asam kuat atau basa kuat.
Larutan penyangga tersusun dari asam lemah dengan basa konjugatnya atau oleh basa lemah dengan asam konjugatnya. Reaksi di antara kedua komponen penyusun ini disebut sebagai reaksi asam-basa konjugasi.

     klik sini ===>  animasi 


    Komponen Larutan Penyangga


Secara umum, larutan penyangga digambarkan sebagai campuran yang terdiri dari:
  1. Asam lemah (HA) dan basa konjugasinya (ion A-), campuran ini menghasilkan larutan bersifat asam.
  2. Basa lemah (B) dan asam konjugasinya (BH+), campuran ini menghasilkan larutan bersifat basa.

Komponen larutan penyangga terbagi menjadi:
1. Larutan penyangga yang bersifat asam
Larutan ini mempertahankan pH pada daerah asam (pH < 7). Untuk mendapatkan larutan ini dapat dibuat dari asam lemah dan garamnya yang merupakan basa konjugasi dari asamnya. Adapun cara lainnya yaitu mencampurkan suatu asam lemah dengan suatu basa kuat dimana asam lemahnya dicampurkan dalam jumlah berlebih. Campuran akan menghasilkan garam yang mengandung basa konjugasi dari asam lemah yang bersangkutan. Pada umumnya basa kuat yang digunakan seperti natrium, kalium, barium, kalsium, dan lain-lain.
2. Larutan penyangga yang bersifat basa
Larutan ini mempertahankan pH pada daerah basa (pH > 7). Untuk mendapatkan larutan ini dapat dibuat dari basa lemah dan garam, yang garamnya berasal dari asam kuat. Adapun cara lainnya yaitu dengan mencampurkan suatu basa lemah dengan suatu asam kuat dimana basa lemahnya dicampurkan berlebih.


       klik sini ===>  animasi 


      Cara kerja larutan penyangga

Larutan penyangga mengandung komponen asam dan basa dengan asam dan basa konjugasinya, sehingga dapat mengikatbaik ion H+ maupun ion OH-. Sehingga penambahan sedikit asam kuat atau basa kuat tidak mengubah pH-nya secara signifikan. Berikut ini cara kerja larutan penyangga:
1. Larutan penyangga asam
Adapun cara kerjanya dapat dilihat pada larutan penyangga yang mengandung CH3COOH dan CH3COO- yang mengalami kesetimbangan. Dengan proses sebagai berikut:
Pada penambahan asam Penambahan asam (H+) akan menggeser kesetimbangan ke kiri. Dimana ion H+ yang ditambahkan akan bereaksi dengan ion CH3COO- membentuk molekul CH3COOH.
CH3COO-(aq) + H+(aq) → CH3COOH(aq)
Pada penambahan basa Jika yang ditambahkan adalah suatu basa, maka ion OH- dari basa itu akan bereaksi dengan ion H+ membentuk air. Hal ini akan menyebabkan kesetimbangan bergeser ke kanan sehingga konsentrasi ion H+ dapat dipertahankan. Jadi, penambahan basa menyebabkan berkurangnya komponen asam (CH3COOH), bukan ion H+. Basa yang ditambahkan tersebut bereaksi dengan asam CH3COOH membentuk ion CH3COO- dan air.
CH3COOH(aq) + OH-(aq) → CH3COO-(aq) + H2O(l)
2. Larutan penyangga basa
Adapun cara kerjanya dapat dilihat pada larutan penyangga yang mengandung NH3 dan NH4+ yang mengalami kesetimbangan. Dengan proses sebagai berikut:
Pada penambahan asam Jika ditambahkan suatu asam, maka ion H+ dari asam akan mengikat ion OH-. Hal tersebut menyebabkan kesetimbangan bergeser ke kanan, sehingga konsentrasi ion OH- dapat dipertahankan. Disamping itu penambahan ini menyebabkan berkurangnya komponen basa (NH3), bukannya ion OH-. Asam yang ditambahkan bereaksi dengan basa NH3 membentuk ion NH4+.
NH3 (aq) + H+(aq) → NH4+ (aq)
Pada penambahan basa Jika yang ditambahkan adalah suatu basa, maka kesetimbangan bergeser ke kiri, sehingga konsentrasi ion OH- dapat dipertahankan. Basa yang ditambahkan itu bereaksi dengan komponen asam (NH4+), membentuk komponen basa (NH3) dan air.
NH4+ (aq) + OH-(aq) → NH3 (aq) + H2O(l)


     Perhitungan pH Larutan Penyangga


1. Larutan penyangga asam
Dapat digunakan tetapan ionisasi dalam menentukan konsentrasi ion H+ dalam suatu larutan dengan rumus berikut:
[H+] = Ka x a/g
atau
pH = p Ka - log a/g
dengan, Ka = tetapan ionisasi asam lemah
a  = jumlah mol asam lemah
              g  = jumlah mol basa konjugasi
2. Larutan penyangga basa
Dapat digunakan tetapan ionisasi dalam menentukan konsentrasi ion H+ dalam suatu larutan dengan rumus berikut:
[OH-] = Kb x b/g
atau
pH = p Kb - log b/g
dengan, Kb = tetapan ionisasi basa lemah
b  = jumlah mol basa lemah
              g  = jumlah mol asam konjugasi

      Fungsi Larutan Penyangga

Adanya larutan penyangga ini dapat kita lihat dalam kehidupan sehari-hari seperti pada obat-obatan, fotografi, industri kulit dan zat warna. Selain aplikasi tersebut, terdapat fungsi penerapan konsep larutan penyangga ini dalam tubuh manusia seperti pada cairan tubuh. Cairan tubuh ini bisa dalam cairan intrasel maupun cairan ekstrasel. Dimana sistem penyangga utama dalam cairan intraselnya seperti H2PO4- dan HPO42- yang dapat bereaksi dengan suatu asam dan basa. Adapun sistem penyangga tersebut, dapat menjaga pH darah yang hampir konstan yaitu sekitar 7,4. Selain itu penerapan larutan penyangga ini dapat kita temui dalam kehidupan sehari-hari seperti pada obat tetes mata.


     klik sini ===>  animasi

Rabu, 16 Maret 2011

Safari & Beach, Tanzania & Zanzibar Honeymoon

Safari & Beach, Tanzania & Zanzibar Honeymoon
Duration: 11 days, 10 nights From: $3,550 per person
All of our tours are private and therefore customisable.  We are always open to suggestion!  Please note that as well as the excellent accommodation offered in these itineraries, you can also lodge in mid-classed accommodation, or choose a basic camping option. Enquire about this safari 

by zanzibar honeymoon

Day 1 

Arrival in Arusha. You will be picked up by our driver from the airport, and transferred to the Arusha countryside, where you will overnight in comfort in preparation for your safari trip.
Staying at Rivertrees Country Inn – This elegant and welcoming country house offers delicious fresh food and warm hospitality in the Arusha countryside for you and your family. The surroundings are beautiful and green, and wandering in the expansive grounds spotting birds is simply lovely. Feel free to explore the wilderness on your holidays.


Day 2

An exciting afternoon game drive safari at Lake Manyara National Park – This park is home to many of Africa’s greatest animals, including Masai giraffe, elephant, crocodile, hippo and plains zebra. It is also home to over 400 species of bird, including the fish eagle, flamingo and tawny eagle.
Staying at Kirurumu Tented Lodge– This is fabulous honeymoon lodging in luxury tents. The surroundings are equally fabulous, with the Ngorongoro Highlands rising behind the camp, and the rift valley floor at the front. Just the perfect safari holiday.
Day 3

Take a thrilling safari game drive towards the Serengeti – This world-famous national park is home to the African “Big Five” along with giraffe, zebra, wildebeest, monkeys, baboons, hippo and antelope.  For those who visit at the right time of year, there is also the chance to see the Great Migration in full swing.
Staying at Mapito Tented Camp – A luxury tented camp tucked away in a clearing.  Spend the evening sitting around the blazing campfire and listen to the sounds of the African night fill your ears.


Day 4
 
Full day to explore the Serengeti, perhaps spotting animals you may not have spotted on your first game drives.
Staying at Mapito Tented Camp.


Day 5

Take an exhilarating guided walk at the rim of the Ngorongoro Crater where, accompanied by a ranger or Masai guide, you will spot birds and monkeys in the verdant surrounds, and really feel you have experienced Tanzania on foot.
Staying at the Ngorongoro Sopa Lodge – The view of the spectacular Ngorongoro Crater is simply unbelievable from this lodge. Feel free to take a dip in the swimming pool, which is located on the rim of the crater.


Day 6
Take a thrilling full day game drive on the floor of the Ngorongoro Crater – A really special place where you can spot the famous African ‘Big Five’, which consists of cape buffo, elephant, black rhino, leopard and lion. A game drive on the crater floor, with its astounding concentration of wild animals, is simply unbeatable!
Staying at the Ngorongoro Sopa Lodge.


Day 7

Today you will head for the beaches of Zanzibar, Tanzania’s own Indian Ocean island paradise. You can simply relax and enjoy the sunshine on your honeymoon, and while away the days soaking in the laid-back atmosphere.
Staying at The Zanzibari Hotel – a delightfully tranquil boutique hotel in Nungwi, on the northern-most tip of the island.  All rooms enjoy views over the verdant and brightly-coloured gardens, and of course the Indian Ocean, and the infinity pool is the best place to seek relief from the midday heat.


Day 8-10
Days to spend relaxing in Nungwi. Staying at The Zanzibari Hotel.


Day 11
Transfer to Zanzibar Airport for your onward journey, in accordance with your schedule.

Senin, 07 Maret 2011

Designing the RockMelt Logo

Designing the RockMelt Logo

2011 March 2
 
by Mike Aurelio
 
Way back in 2009 we at DesignMap were working on a stealth project for a new web browser called RockMelt, now in public beta. Part of that project was the design of their logo, which went on and off over the span of two months. With other projects going on simultaneously and the amount of work that we put in for this project overall, the two months allotted for logo design ended up feeling like 2 weeks. We thought this would be a fairly simple project, but we hit plenty of brick walls, made some piles of crap, suffered moments of total despair, and eventually arrived at an “aha!” moment where everything came together. Come to think of it, I think I just described every design project I’ve ever worked on.
One note of caution: If you’re looking for a post about “how to execute the perfect logo design project,” this isn’t it. And, while I love when a project goes smoothly, I think we as designers grow the most when being presented with and overcoming challenges. And so, this post is about the challenging process of designing the RockMelt logo and the things we would do differently if we had it to do over again.
What’s that, a Rock-Melt you say?
It all began with a name that brought to mind a geological phenomenon and a fuzzy idea of a socially connected browser. I love the fuzzy zone — nothing but options — but I dread it for the same reason. Our attempt to clarify the “fuzz” began with an effort to find the relationship between the name and the product. We visualized its parts, the name’s combination of two elemental opposites, rock and melt (solid and liquid), and the product, a socially networked web browser.
This first step considered conceptual directions we might take. Do we go for a unique type treatment? Do we emphasize the letters R and M? Do we make an icon of a physical thing like a mountain, volcano, melting rock, cave structures or a molten sphere? Interestingly, nobody gravitated too heavily to the molten sphere that would eventually transform into the final logo. The three directions that were chosen are marked with green asterisks below: a mountain graphic that integrated the name (far left), the name sculpted from stone (top right) and an emphasis on the letters R and M.
figure 1.1
Next we explored the three chosen directions further. This was a very short round of explorations that happened in about a day. Almost immediately, the decision to dig deeper into one particular variation (with green asterisk below) was made. At the time we  at DesignMap and RockMelt felt like this variation had a lot of possibilities (and it did as you’ll see further in the post). Looking at it now, though, a literal mountain graphic feels like the user might receive a Clif bar and a ski pass with every download.
figure 1.2
A mountain of exploration
In the beginning there was a vast valley of possibilities, but we had arrived at our mountain. Well, lots of mountains as you’ll see below. We explored color, shapes, introduced a flame image (feel free to chuckle), added detail, stripped detail and on and on. This became cycle of illustrating variations only to find that they became almost completely unrecognizable — sometimes even resembling a pile of crap — at desktop icon size. Not exactly what we were going for.
In our first set we worked in black and white so we could focus on the interacting shapes of the graphic. Was the mountain organic and realistic or geometric and abstract? How could  we arrange the type in relation to the mountain? It was also at this point that we recognized the need to introduce the “melt” characteristic to the logo, so we tried various placements of drips. We introduced a flame to represent a source that causes the melt. This flame within the mountain was a direction that we pushed further on with, and at that point we believed it would in fact be the ultimate direction of the logo.
figure 1.3
When we introduced color, we started to consider the logo as a desktop icon. This was the most challenging point in the project. We were straddling a line. On one side was the conceptual area where we were still making variations of a mountain and flame, and on the other side we were roughly visualizing how the logo would interact with its environment — a person’s desktop and toolbar.
Since we were cranking out a lot of variations in a short amount of time we worked primarily in vectors with plans to move to pixels the favorite variations became clear. Since the PC version of the browser was going to be in blue tones we went away from grey and blues as the base shape (the mountain) in favor of warm oranges and reds. Also, the warm colors felt like a nice expression of the “melt” characteristic.
figure 1.4
As part of the quick variations, we created small and large versions side by side on a Windows-like blue background.
figure 1.5
We then placed our favored logo variations on a desktop and a Windows XP toolbar. We wanted to assess what a triangular, mountain shape looked like in these environments, especially side-by-side with other popular browser icons. This is where things got a little tricky. We felt that the flame and mountain became hard to recognize as such and, in my opinion, sort of resembled a Star Trek logo. I did like that our shape didn’t follow the trend of round logos for web browsers, but unfortunately it wasn’t working.
figure 1.6
However, we weren’t ready to give up on the mountain yet. In an effort to strengthen the mountain’s recognizability, we did some variations without the flame and made the mountain more organic and realistic. We settled on a common desktop icon size of 32 x 32 pixels and created a few Photoshop variations. This was the last of the mountain variations resulting in the infamous “piles of crap.”
figure 1.7
Back to the drawing board
Circling back to the initial sketches we took a small step away from the mountain and decided to see what we could come up with for a mountain with molten lava spewing from it, a.k.a. a volcano. We had three volcanic directions — a dimensional volcano in a sphere, a dimensional volcano on a plane and a flattened volcano on a circular disc. We thought the problem with legibility was that the organic shape was too unusual to recognize by itself on an unpredictable desktop background, and we hoped that by placing it on a recognizable geometric shape, we would grant the mountain legibility.
figure 1.8
At this point, instead of making many variations in Adobe Illustrator, we chose the volcano in a sphere. This time we rendered it almost immediately in Photoshop for two reasons: First, time was running out and the pressure to deliver was mounting. Second, this allowed us to quickly assess the problems with legibility that we were facing before.
figure 1.9
We tested a transparent sphere and a sphere with a solid background on a range of colored desktop backgrounds. However, it was still hard to read specifically as a volcano in a sphere and we had hit another brick wall.
figure 2.1
The big “Aha!”
At this point we were at our wits’ end. In addition to the scaling and recognizability issues there was another thing that was bugging us — our mountain and volcano directions were considering characteristics of the name, rock and melt, but the product as a social web browser was completely disregarded. The final solution wasn’t completely apparent even though the answer was staring us in the face back on the initial set of concept sketches. I don’t remember if we specifically revisited the initial concept sketches or if all of the work we had done up until that point somehow started to come together, but I do remember having a “eureka” moment as I imagined the logo one morning as I got ready for work. When I arrived at the office, I sat and roughly sketched up a new take on the “molten sphere” — this time combined with an iconic networked globe image — and shared it with the team. It was very well received and the marriage between rock, melt and a social web browser finally resonated! It scaled down perfectly, the colors worked beautifully and the RockMelt logo was born.
This is the condensed timeline of the RockMelt logo’s lineage. In top to bottom, left to right order are the first two concept sketches, the first Photoshop rendering and the final rendering done by Nate (Principal, DesignMap), which gave it an excellent realism and edge.
figure 2.2
In hindsight, things I would do differently:
Time permitting, I would push the three directions (figure 1.2) further and do a lot more variations. In the additional variations I would look for more ways to convey the idea of a social web browser.
Additionally, I think the variations (figure 1.2) were still heavily weighted as conceptual ideas. In other words, the drawings were thinking of the concept or essence of the eventual logo without taking into account the eventual size and environment of the logo.  That’s not to say that exploring concept at that point was a bad thing, but I think the project would have been more efficiently served if I had layered concept with considering the logo as a desktop icon.
During the mountain phase, we may have began too large (figure 1.4). If we had started small, 16×16 pixels or so, we would have been better able to work out what details form the illusion of a mountain at that size.
The volcano in a sphere (figure 1.9) and the flame in the mountain (figure 1.6) are both unique enough that they would likely require seeing them at a larger scale as a frame of reference to recognize them at a smaller scale. While it’s a good possibility that a user would see the larger version when downloading the browser we didn’t want to completely rely on that. (One could argue that the Firefox logo has a similar issue, but thats a subject for another blog post.)
In conclusion, if you plan on designing a logo that will be a desktop icon always think twice before settling on a mountain image. Also, no matter how simple a design project seems they always become a living, breathing thing that we as designers need to respond and adapt to. And, no matter how many times we as designers tackle projects of similarity they always tend to have unique qualities that challenge us in different ways.
ShareThis

Kamis, 03 Maret 2011

Sistem Ekskresi (Sistem Pengeluaran) pada Manusia

Sistem Ekskresi (Sistem Pengeluaran) pada Manusia

Posted by adilsaz pada 17 Oktober 2009
Tubuh manusia merupakan tempat berlangsungnya berbagai proses metabolisme. Metabolisme adalah perubahan kimia, dengan bantuan enzim yang terjadi di dalam tubuh organisme.Proses metabolisme menghasilkan energi dan zat yang berguna bagi kehidupan . Selain itu, juga terbentuk zat sisa yang merupakan racun bila tetap berada di dalam tubuh. Oleh karena itu, zat sisa harus dikeluarkan dari tubuh melalui sistem ekskresi.
Sistem ekskresi pada manusia dan Vertebrata terdiri atas ginjal, kulit, paru-paru dan hati.

A. Ginjal (Kidney)

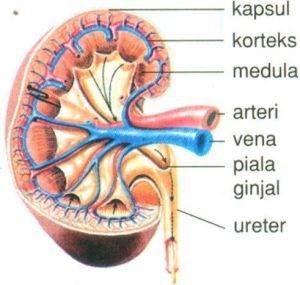
Ginjal manusia berwarna merah kecoklat-coklatan, berbentuk seperti kacang merah, berukuran sebesar kepalan tangan, dan jumlahnya sepasang.
Ginjal berfungsi untuk menyaring darah dan menghasilkan urine.
1. Bagian-bagian Ginjal
Bentuk ginjal yang sudah diiris membujur dapat dilihat pada gambar di bawah ini.
ginjal
2. Proses pembentukan Urine
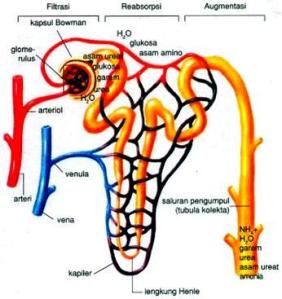
Urine terbentuk melalui serangkaian proses yaitu dimulai dari penyaringan (filtrasi), penyerapan kembali (reabsorpsi), dan pengeluaran zat (augmentasi).
nefron
3. Sistem Uriner
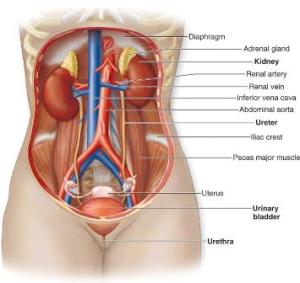
Urine dari rongga ginjal dialirkan melalui ureter menuju kandung kemih. Jika kandung kemih sudah cukup banyak mengandung urine, maka dinding kandung kemih menjadi tertekan sehingganya tekanan inilah yang menimbulkan rasa ingin buang air kecil. Selanjutnya, urine dikeluarkan melalui saluran pembuangan yang disebut uretra.
Urinary System
video animasi

B. Kulit (Skin)

Kulit adalah lapisan jaringan yang terdapat di permukaan tubuh. Pada permukaan kulit terdapat kelenjar keringat yang mengekskresi zat-zat sisa. Zat-zat sisa yang dikeluarkan melalui pori-pori kulit berupa keringat yang tersusun dari air dan garam-garam mineral terutama garam dapur (NaCl) yang merupakan hasil metabolisme protein.
1. Bagian-bagian Kulit
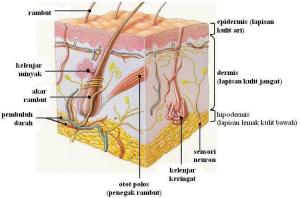
Kulit manusia tersusun dari tiga laisan, yaitu kulit ari (epidermis), kulit jangat (dermis), dan jaringan ikat bawah kulit (hipodermis)
kulit (penampang)
2. Fungsi Kulit
Selain sebagai alat pengeluaran, fungsi kulit sebagai berikut :
a. Pengatur suhu tubuh.
b. Pelindung tubuh dari gangguan fisik berupa tekanan, gangguan biologis berupa jamur dan gangguan yang bersifat kimiawi.
c. Tempat penyimpanan kelebihan lemak.
d. Tempat pembentukan vitamin D dari provitamin D dengan bantuan sinar matahari.
e. Tempat indera peraba dan perasa.

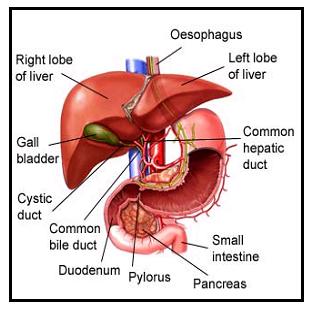
C. Hati (Liver)

Hati merupakan kelenjar terbesar pada manusia, warnanya merah tua, dan massanya lebih kurang 2 kg. Hati terbagi dalam dua belahan utama, yaitu belahan kanan dan kiri.
Hati berperan sebagai alat ekskresi sekaligus alat sekresi, karena hati menghasilkan cairan empedu yang berguna dalam proses pencernaan lemak.
1. Bagian-bagian Hati
liver-1
2. Fungsi Hati
Selain sebagai alat pengeluaran, hati berfungsi sebagai berikut :
a. menyimpan gula dalam bentuk glikogen.
b. menawarkan racun.
c. mengubah provitamin A menjadi vitamin A.
d. mengatur kadar gula dalam darah.
e. membuat fibrinogen serta protombin.
f. tempat pembentukan urea
g. menghasilkan cairan empedu

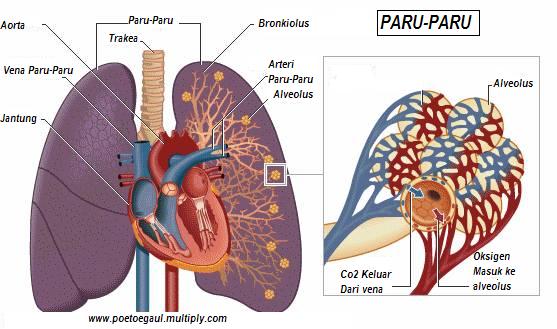
D. Paru-paru

Selain sebagai alat pernafasan, paru-paru juga sebagai alat ekskresi yaitu mengeluarkan karbondioksida dan uap air.
Paru-paru terletak dalam rongga dada dan bagian bawahnya menempel pada diafragma.

Paru-Paru2-edited


lihat video animasi (klik disini)

video animasi
1. Setiap batang rokok merusak dirimu

2. Setiap batang rokok merusak dirimu

Minggu, 27 Februari 2011

broadband learning center by telkom

ada wifi juga


ngga nyangka aja ternyaa bukan hanya kota kota besar yang kaya bleduk tapi pasar pun punya kawasan belajar dan internet yang super cepat


clean market     


tampak gerbang


puspa agro

MY PHOTO

MY PHOTO
HOW CUTE ... :P